Ultimate Guide to Walk-In Shower Design for Any Bathroom Space
Introduction
Walk-in shower design has revolutionized modern bathroom remodeling, transforming cramped spaces into luxurious, spa-like retreats. These barrier-free shower solutions eliminate the need for traditional doors or curtains, creating an open, seamless experience that maximizes both visual space and accessibility.
Whether you’re dealing with a compact powder room or a spacious master suite, understanding the fundamentals of walk-in shower design empowers you to make informed decisions that enhance your home’s value and daily functionality. The key lies in balancing aesthetics, practicality, and your specific spatial constraints.
In this comprehensive guide, you’ll discover proven design principles, space-saving strategies, material selection criteria, and installation considerations that professional contractors use to create stunning walk-in showers. You’ll also learn about code requirements, waterproofing essentials, and cost-effective approaches that deliver maximum impact regardless of your budget or bathroom dimensions.
Essential Walk-In Shower Design Principles
Space Requirements and Layout Planning
Successful walk-in shower design begins with understanding minimum space requirements. The International Residential Code mandates a minimum interior dimension of 30 inches by 30 inches for shower compartments, but practical walk-in designs typically require at least 36 inches by 48 inches to function comfortably without a door.
The shower opening should measure a minimum of 22 inches wide, though 24 to 36 inches provides more comfortable access. This opening width directly impacts water containment and user experience. Consider the “splash zone” – water typically travels 18 to 24 inches from the showerhead, so position the opening perpendicular to the water flow when possible.
For corner installations, the most water-efficient approach places the showerhead on the wall farthest from the opening. This configuration minimizes overspray while maintaining easy access. In linear or alcove layouts, center-mounted or offset showerheads can work effectively with proper glass paneling or strategic wall placement.
Slope and Drainage Fundamentals
Proper drainage forms the backbone of any successful walk-in shower design. The shower floor must slope toward the drain at a minimum rate of 1/4 inch per foot, though 1/2 inch per foot provides more reliable water evacuation. This slope should be consistent across the entire shower floor to prevent standing water and potential mold issues.
Linear drains offer superior drainage performance compared to traditional center drains, particularly in larger walk-in showers. These rectangular drains can span the entire width of the shower, allowing for more subtle floor slopes and easier tile installation. Position linear drains along the back wall or shower entrance for optimal water collection.
Curbless designs require careful coordination with the adjacent bathroom floor. The shower floor must sit lower than the bathroom floor to maintain proper drainage while meeting accessibility guidelines. This typically requires lowering the subfloor or using specialty drainage systems designed for barrier-free installations.
Material Selection for Walk-In Shower Design Success
Flooring Options and Performance
Walk-in shower flooring demands materials that combine slip resistance, water resistance, and aesthetic appeal. Natural stone tiles like slate, granite, and textured marble provide excellent slip resistance when properly sealed, but require ongoing maintenance to prevent water damage and staining.
Porcelain and ceramic tiles engineered specifically for shower applications offer superior water resistance and easier maintenance. Look for tiles with a Coefficient of Friction (COF) rating of 0.42 or higher for wet conditions. Smaller tile formats create more grout lines, which increase slip resistance but require more maintenance.
According to Energy.gov, proper material selection can significantly impact long-term energy efficiency by reducing maintenance requirements and extending the shower’s lifespan. Penny rounds, hexagonal mosaics, and textured large-format tiles provide excellent slip resistance while maintaining modern aesthetics.
Wall Materials and Water Management
Wall materials in walk-in shower design must withstand constant moisture exposure while complementing your overall bathroom aesthetic. Large-format porcelain slabs minimize grout lines and create seamless, spa-like appearances. These panels can extend from floor to ceiling, eliminating horizontal joints where water typically penetrates.
Natural stone walls require professional sealing and regular maintenance but offer unmatched luxury appeal. Marble, travertine, and granite create stunning focal points, particularly when book-matched or arranged in dramatic patterns. However, these materials require pH-neutral cleaning products and periodic resealing to maintain their appearance.
Engineered surfaces like quartz or solid surface materials provide consistent patterns and superior water resistance. These non-porous materials resist mold and mildew while offering easy maintenance. Custom fabrication allows for integrated soap niches, corner shelves, and seamless transitions between wall and ceiling surfaces.
Walk-In Shower Design Solutions for Different Spaces
Small Bathroom Strategies
Compact bathrooms require clever walk-in shower design strategies to maximize functionality without overwhelming the space. Corner installations utilize often-wasted space while maintaining clear sight lines across the bathroom. Neo-angle designs fit precisely into corner configurations, providing maximum shower space within minimal floor area.
Frameless glass panels extend visual boundaries, making small bathrooms appear larger while containing shower spray effectively. Single glass panels positioned strategically can eliminate the need for full enclosures while providing adequate water protection. This approach works particularly well when combined with handheld showerheads that offer directional control.
Vertical design elements draw the eye upward, creating perceived height in compact spaces. Floor-to-ceiling tile installations, vertical accent stripes, and wall-mounted fixtures emphasize height over width. Light-colored materials reflect available natural and artificial light, further enhancing the sense of spaciousness.
Large Bathroom Opportunities
Spacious bathrooms allow for more elaborate walk-in shower design features that create true luxury experiences. Multi-head shower systems with rainfall, body sprays, and handheld components require adequate space and water pressure but deliver spa-like experiences. Plan for 75 to 100 gallons per minute capacity for multiple simultaneous fixtures.
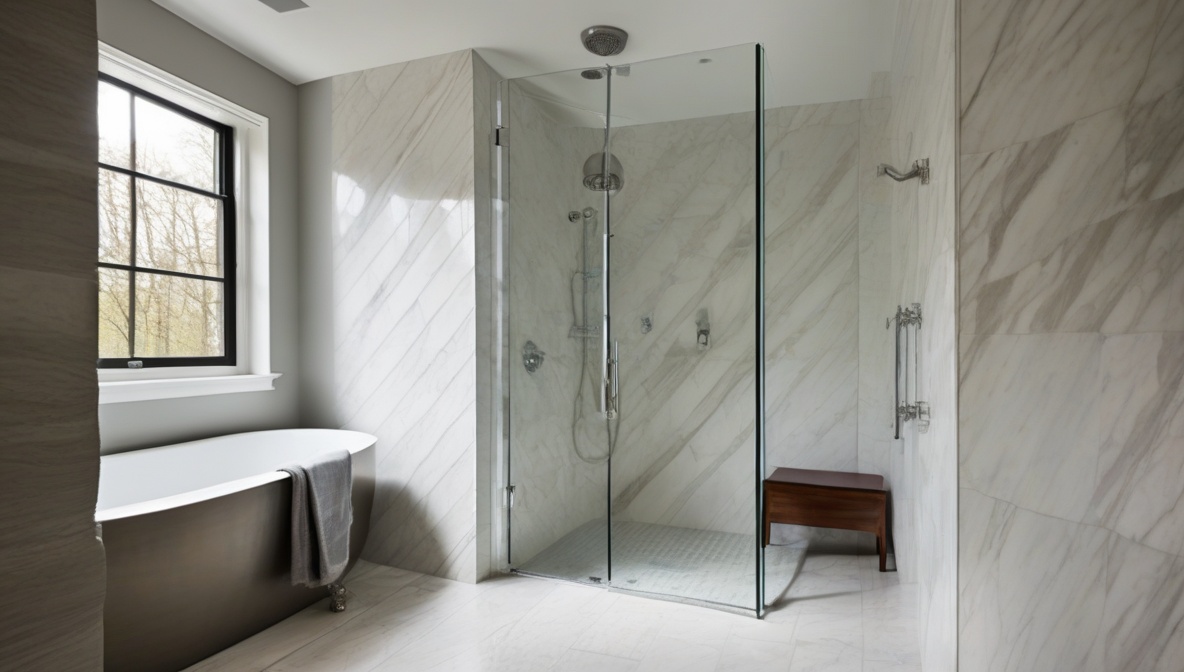
Freestanding glass enclosures create dramatic focal points in large bathrooms while maintaining open sight lines. These installations require structural support and professional installation but offer maximum design flexibility. Consider curved glass panels, specialty hardware, and integrated lighting for premium aesthetics.
Built-in seating transforms large walk-in showers into relaxation spaces. Stone or tile benches provide comfortable resting areas while serving as design elements. Position seating away from direct water flow while ensuring proper drainage underneath to prevent water accumulation and structural issues.
Installation Considerations and Professional Requirements
Waterproofing and Vapor Management
Professional waterproofing forms the foundation of any successful walk-in shower design project. Modern waterproofing systems extend beyond traditional shower pans to include full wall protection using liquid membranes, sheet membranes, or foam board systems.
The waterproof barrier must extend at least 6 inches beyond the shower area on all sides, with special attention to corners, penetrations, and transitions. Inside corners require reinforcing fabric embedded in waterproofing material, while outside corners need careful detailing to prevent membrane tears during installation.
Vapor barriers behind shower walls prevent moisture infiltration into wall cavities, which can cause mold, rot, and structural damage. Family Handyman emphasizes the importance of proper vapor barrier installation, particularly in cold climates where temperature differentials create condensation risks.
Plumbing and Electrical Coordination
Walk-in shower design requires careful coordination between plumbing and electrical systems to ensure proper function and code compliance. Shower valves must be positioned 38 to 48 inches above the finished floor, with controls easily accessible from outside the direct water spray.
Multiple showerhead installations require adequate water pressure and volume. Most residential systems provide 40 to 60 PSI water pressure, sufficient for standard installations but potentially inadequate for multi-head systems. Consider pressure-balancing valves and individual shutoffs for complex installations.
Electrical requirements include GFCI-protected circuits for any electrical devices within the shower area. Ventilation fans should provide a minimum of 1 CFM per square foot of bathroom area, with higher capacity recommended for walk-in showers that generate more steam due to their open design.
Cost-Effective Walk-In Shower Design Approaches
Budget-Friendly Material Alternatives
Achieving stunning walk-in shower design results doesn’t require premium materials throughout. Strategic splurging on focal elements while economizing on less visible components can deliver high-impact results within reasonable budgets.
Ceramic tiles that mimic natural stone provide luxury aesthetics at fraction of natural material costs. Modern manufacturing techniques create realistic textures, patterns, and color variations that closely replicate marble, travertine, and slate appearances. These alternatives offer superior water resistance and easier maintenance than natural materials.
Prefabricated shower bases eliminate the need for custom tile work while providing reliable waterproofing and proper drainage slopes. Quality acrylic and fiberglass bases accept tile coverings, allowing custom appearances over manufactured reliability. This approach reduces installation time and potential waterproofing failures.
DIY-Friendly Design Elements
Certain walk-in shower design elements lend themselves to DIY installation, allowing homeowners to reduce labor costs while maintaining professional results. Tile installation, particularly with large-format materials and modern adhesives, can be accomplished by motivated homeowners with proper preparation and tools.
According to This Old House, proper surface preparation and material selection are crucial for DIY success. Focus on simpler layouts with fewer cuts and complex details. Leave waterproofing, plumbing, and structural modifications to licensed professionals to ensure code compliance and warranty protection.
Fixture installation, accent lighting, and finishing details offer opportunities for DIY involvement without compromising critical systems. Research local code requirements and permit needs before beginning any electrical or plumbing work, as improper installation can create safety hazards and insurance complications.
Accessibility and Universal Design Features
Modern walk-in shower design increasingly incorporates universal design principles that accommodate users of all ages and abilities. These features enhance daily functionality while potentially increasing home value and market appeal.
Curbless entries eliminate tripping hazards while accommodating wheelchairs, walkers, and other mobility devices. These installations require careful floor planning to maintain proper drainage while meeting ADA guidelines for maximum slope and surface transitions.
Grab bars integrated into shower design provide safety without compromising aesthetics. Modern grab bars are available in designer finishes that complement fixtures and hardware. Plan grab bar locations during initial construction to ensure proper structural support within wall framing.
Adjustable and handheld showerheads accommodate users of different heights and mobility levels. Sliding bars allow height adjustment, while handheld units provide directional control and seated shower capabilities. Consider multiple mounting points for maximum flexibility.
Maintenance and Longevity Considerations
Sustainable walk-in shower design prioritizes materials and configurations that minimize ongoing maintenance while maximizing lifespan. These decisions impact both daily convenience and long-term ownership costs.
Grout selection significantly impacts maintenance requirements. Epoxy grouts resist staining and mold growth better than traditional cement grouts but require more careful installation. Alternatively, grout-free installations using large-format tiles or solid surface materials eliminate grout maintenance entirely.
Water-efficient fixtures reduce environmental impact and utility costs without compromising performance. EPA WaterSense certified showerheads use no more than 2.0 gallons per minute while maintaining satisfying spray patterns through innovative engineering and design.
Regular maintenance schedules preserve walk-in shower appearance and function. Weekly cleaning with appropriate products, monthly grout inspection, and annual sealer applications for natural stone surfaces prevent small issues from becoming expensive repairs.
Frequently Asked Questions
What’s the minimum size for a walk-in shower?
The minimum practical size for a walk-in shower is 36 inches by 48 inches, though 42 inches by 60 inches provides more comfortable use. Code requirements specify 30 inches by 30 inches interior dimensions, but this size requires a door and doesn’t accommodate true walk-in functionality.
Do walk-in showers increase home value?
Walk-in showers typically increase home value by 10-15% of the renovation cost, particularly in master bathrooms. The exact increase depends on local market conditions, overall bathroom quality, and installation craftsmanship. Universal design features can provide additional value for aging-in-place buyers.
How do you prevent water from splashing out of a walk-in shower?
Proper showerhead positioning, strategic glass panels, adequate shower depth, and correct floor slopes prevent water splash. Position the showerhead away from the opening, use partial glass screens where needed, and ensure the shower extends at least 36 inches from the opening to the opposite wall.
What type of glass is best for walk-in shower panels?
Tempered glass is required by code for shower applications due to its safety properties. 3/8-inch thickness provides good stability for most installations, while 1/2-inch glass offers premium feel and reduced flex. Consider low-iron glass for clearest appearance and protective coatings to reduce water spotting.
Can you install a walk-in shower in any bathroom?
Most bathrooms can accommodate walk-in shower design with proper planning, though structural modifications may be required. Key considerations include adequate space, proper drainage slope, structural support for glass panels, and compliance with local building codes. Professional assessment determines feasibility for specific situations.
How much does a walk-in shower installation cost?
Walk-in shower installation costs range from $3,000 to $15,000 depending on size, materials, and complexity. Basic installations with standard materials start around $3,000, while luxury installations with premium materials and multiple fixtures can exceed $15,000. Labor typically represents 40-60% of total project cost.
Do walk-in showers require special ventilation?
Walk-in showers benefit from enhanced ventilation due to their open design, which can increase steam production. Install exhaust fans rated for at least 1 CFM per square foot of bathroom area, with higher capacity recommended for large or multiple-head installations. Proper ventilation prevents mold growth and moisture damage.
References
- Energy.gov – Energy Efficiency and Sustainable Building Practices
- Family Handyman – DIY Installation and Waterproofing Guidance
- This Old House – Professional Installation Techniques and Best Practices
- EPA WaterSense – Water-Efficient Fixture Certification and Guidelines
Conclusion
Successful walk-in shower design combines careful space planning, appropriate material selection, and professional installation techniques to create functional, beautiful bathroom spaces. Whether working with compact powder rooms or spacious master suites, the principles outlined in this guide provide the foundation for informed decision-making and successful project outcomes.
Remember that walk-in shower design represents a significant investment in your home’s functionality and value. Prioritize proper waterproofing, adequate drainage, and code compliance over purely aesthetic considerations. When budget constraints require compromises, focus spending on structural elements and waterproofing while economizing on finish materials that can be upgraded later.
Professional consultation during the planning phase can prevent costly mistakes and ensure your walk-in shower design meets your needs for years to come. Take time to research local contractors, verify licensing and insurance, and request detailed proposals that outline materials, labor, and timeline expectations. With proper planning and execution, your walk-in shower will provide daily luxury while enhancing your home’s long-term value and appeal.